"You are so creative!" I have heard that phrase constantly since I was little. DIY, Refashioning, Crafting, Sewing, Woodworking. I love it all! Now I have a place to keep my favorite projects or ideas organized and share them with you!


Wednesday, July 28, 2010

Special Day Banners!

Photobucket
Dress up any party or special occasion with this easy to make, yet impressive looking banner.

I had seen these in photos of parties planned by professional party planners and knew I could easily make them myself. I know you can too!


Photobucket
What you need:
Scrapbook Paper
Scissors
Computer and Printer
Scrap Paper
Glue Stick
Hole Punch
Ribbon

How:
To make your letters, choose a font on the computer you like and change your font size to around 300. Some fonts are just generally larger, so play with the font until you get a size you like.

Photobucket

Then print it out on scrap paper of course, and holding it on a piece of scrapbook paper. Then cut around the letter shape.

Photobucket

Using your cut out letters as a guide for size draw out a triangle shape that the letter will fit on. Use this one for a pattern and make as many as you will need for the letters you are using.

Use a glue stick or other adhesive of choice to attach the letters to the triangles. For this banner I used my son's Korean name on the banner for his first "Dol"zz or Korean tradtional first birthday celbration.

Photobucket

Use a hole punch and punch one hole on each corner of the top of the triangles. Using ribbon string the triangles together in the correct order.

Hang up and you are finished! A professional look without spending much.

Photobucket

Also check out the post on how to make your own Balloon Towers like in the picture above.

MOPS Creative Activity: This can easily be a good MOPS Creative Activity by changing it to a banner that has the word JOY around Christmas time. It would involve making a pattern pieces for moms to trace for the letters J, O, and Y. and a pattern for the triangle. Then they would trace, cut, glue ,punch and string on some ribbon. They would take home the fun knowledge of how to make a banner for their children's parties, and also have a nice Christmas Decoration for their front door, windows, or fireplace.

Tuesday, July 27, 2010

Bandanna Pants

Photobucket

My daughter was playing with a bandanna this morning that she got at a birthday party. This reminded me of all the fun things you can make out of bandannas. Of course one of my favorite ideas is Bandanna Pants. I knew right then, this was our project for today.

When I first saw the idea for bandanna pants my daughter was a bit too small to fit into them, but now she and my son are just the right size. Actually bandanna pants/shorts can fit sizes 4 up to size 10. Of course they become shorts instead of pants as the size goes up.

Photobucket

If you are looking for a first time pants/shorts project this is the one for you. Doesn't get any easier than this when it comes to pants. Especially since some seams are already finished before you even begin. Bandanna pants took me no more than 10 minutes to complete start to finish. What a fun project!

Bandannas you can usually find for around a $1 a piece at craft stores. They come in all colors and patterns these days. Today we even saw Disney characters such as Tinkerbell and Cars. Spiderman also made an appearance!

Bandanna pants are lightweight breathable and soft once they are washed. They make great PJ pants/shorts and are great for just playing around in the backyard as well.

Photobucket

What you need:

Two bandannas

Non-roll Elastic (ours was around an inch thick)

Sewing Machine

Scissors

How?
1.Place your bandannas on top of each other right sides together. They may not be perfectly square with each other. Just do your best.

2.Fold them in half, and cut a narrow curve out of the open side cutting though the four layers. Like this.

Photobucket

3.Open back up to flat and sew right along this curve you just cut. You will do this on both sides so it looks like this. I sewed a double seam for strength.

Photobucket

Photobucket

4.Now pick them up and hold them open the two seams you just showed should be the crotch seam and the seam that goes on the backside. You can kind of see the shorts at this point.

Photobucket

5. Now pick up one layer from the back and one layer from the front and pin together. Do this on both sides to create legs. Sew these seams together, up one side and down the other. I did a double seam here as well.

Photobucket

Photobucket

6. Now they will look like shorts. Next step will be to make a tunnel for you elastic to go though at the top of the shorts. Fold down the top and sew around leaving a space open for your elastic.

7. Measure on the child how big the elastic will need to be to be comfortable. Then cut an inch longer than that.

8. Use a safety pin to string the elastic though the tunnel. Once it is through hold both ends and sew two zig zag seams on the elastic to hold it together.

9. Put the elastic ends, which are now attached to each other, back into the tunnel and make sure they are not twisted. Sew the opening shut.

Done!

Now... I know you were all waiting for the photo shoot!

Photobucket
Humpty and Dumpty sat on a wall. Ok bench.

Photobucket
Humpty had a great jump.

Photobucket
Dumpty did too.

Photobucket
Humpty wanted to do an instant replay.

Photobucket
Dumpty sat, appeared reflective, and pondered life. :)

Here is another good turorial on how to make them. It also has photos of makeing a waist band and putting the elastic through. I got too excited and forgot to take pics of that step.

Monday, July 26, 2010

Super Snack Mix

Photobucket

This is a tried and true Mix that my friend's family introduced our family too back in my early High School years. It has been a summer staple in my household ever since.

This is so simple it is so crazy, but it is the perfect combo of salty and sweet!

What you need:
Golden Grahams Cereal (the non-generic version, trust me)
Pretzel Sticks
Dry Roasted Peanuts
Plain M&M's (I went a little heavy on the m&m's in the picture just to add some color.)

What you do:
Mix it together in whatever ratio looks even or good to you.

We carry it camping, pack it on picnics, and even bring it to our 4th of July pot luck bash each year. It is a hit, and people love to munch it all night while watching the fireworks.

We bring a big bowl of mix and plastic cups. Guests scoop some in their cups and munch away.

I think it lends itself to the campsite so well because it kind of has a "camp like" flavor of smores. The flavors of graham crackers, and chocolate are present, and the roasted flavor comes from the peanuts and a bit of sugary marshmallow flavor from the frosted coating on the Golden Grahams.

This year though I also discovered a super snack mix secret.

Shh...

I will tell you....

This stuff ROCKS on ice cream!!!

Photobucket

It is also a great way to use up the crumbs at the bottom of the bowl.

Yummy!!!!

Frames Frames Frames REBORN!

I had a friend ask what they could do with their old photo frames. All miss matched and such. Here were three ideas I decided were worth trying out.

Now miss matched frames can look awesome just on their own. See how in this arrangement they just filled them with random things and hung them in an interesting arrangement. I LOVE this!
Found on Flickr here

Yet while I like this, some may not, (like my husband) so here are a few other things you can do.

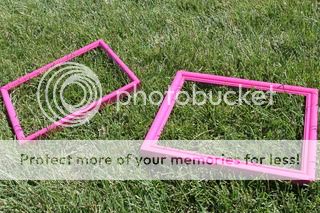
Here were my two frames to start.

Photobucket

Both 5 by 7. Not matching. One super easy fix is just to paint odd miss matched frames all one color.

Just look what a little spray paint can do!

Photobucket

I could use these for photos or art projects in my daughter's room right now.

Maybe go with black spray paint and fill with black and white photos in a neat layered arrangement on a solid wall. This would be I think a very cool look.


Or try this!

Letter Wall Art!
Photobucket

This one came to me on a stroll though Hobby Lobby. In the wall art section they had cute black frames just like these with a black letter in each and a mesh type ribbon tied up top to hang. I thought to myself. "I so could do this easily." Possibilities with this are endless, think of the funky scrapbook paper letters, or even flowers and such you could have in the frame for this project.

What I did was choose a font on the computer I liked and blew it up to 500.
Photobucket

Then I printed it out on strap paper of course, and holding it on a piece of scrapbook paper (Imagine the different colors and patterns you could use) I cut around the letter shape.
Photobucket

Next I sandwiched it between two pieces of frame glass. Use a little tape under the letter to hold it in place so it doesn't slip. (I didn't need the glass for my other frame project so I had an extra one which make this work perfect for me)

I added ribbon to the frame and then glued the pieces of glass in place with a glue gun.
Photobucket

You could do many frames and spell words like BELIEVE or DREAM or your child's name above a crib or their bed. I love how the wall color shows though the frame on artwork like this because it makes the piece match the room automatically.

After I wrote this up, I found another similar tutorial online here
See what a different color can look like! Gorgeous! I love the knob hangers too!

Wall art not for you? Have a go at making...
Travel Felt Boards
Photobucket


Open your frame and discard the glass. I removed the stand on the back and saved it for another project. Then cover the front with some felt. I used white glitter felt. I also covered the back with black felt. Depending on the frame you can either use the closures that are on the frame to secure it into place or you may have to glue it into place depending on if the closures work or not.
Photobucket
Photobucket
Use other felt (we found really cool tie die felt at Michales) to cut shapes and designs to make whatever. Store your pieces in a Ziploc bag and bring it along on long car rides.
The felt pieces stick to the felt so you can hold it up.
Photobucket

Photobucket

Photobucket
Do this with a larger frame in your child's bedroom and the creative wall art can change constantly!

Of course I don't like to throw anything away, so of course I had to find something to do with the frame stand piece I had removed from the frames. This one was obvious! A few cuts here and there, some paint and a couple small holes and it became the perfect...

Play Tie!

Photobucket

With elastic cord to make the on and off easy. Now my youngest son is ready to play house. He is the daddy.

Photobucket

Photobucket
I already can tell that he is going to be a great daddy someday.

Other Crafty Ideas!
Now while these are some things I did do here at home here are some other ideas I liked, but I didn't do because I didn't need them or have the space or frames to do them, but you may!! So I had to include them.

1. Place white paper inside the frame and use wipe off markers for an easy message board.

2. Buy some cork board and cover it with a cool print fabric and use it for a pin message board.

3. Cover some magnetic sheet metal with fabric and make a magnetic message board. Like the one here

Photobucket

4. Fill with fabric and criss-cross some ribbons over it, or yarn around glued buttons to make a snap shot or holiday card holder. This one costs $110 here

Photobucket

5. Paint a board with chalkboard paint and frame it for a fun wall chalkboard like this.

Photobucket

6. Or add some wire mesh or fine chicken wire from the hardware store and made a jewlery holder like the one tutorial here.

Photobucket


Happy Frame Crafting!

Wednesday, July 21, 2010

Garden Rock Plant Signs

Photobucket
Dress up your garden, by dressing up your rocks.

What you need:
Craft Paint
Small Paint Brush
Clear Coat Spray Paint
Rocks

You can make a sign out of anything!!! So I did. I had two large rocks back in our children's garden. They were just hanging out back there not doing much so I decided to put them to good use. We grabbed our paints and got working.

The kids painted their choice of rocks too.
Photobucket

Photobucket

Photobucket
A lady bug, and a blue and red masterpiece.

Photobucket
Here is what I ended up with, while trying to keep my curious one year old from getting paint on his clothes.

Once they are dry you need to get out your clear coat spray paint. This is my cute little can. This is not my first project with it so next time I am going big!
Photobucket

Spray a coat and let it dry and spray again. You can do this project on wood as well. Here are some signs my daughter and I made 3 years ago out of scrap wood. They are starting to weather a bit. These had two coats. A third probably wouldn't hurt.

Photobucket

Photobucket
Yes... I know those are not pumpkins. They didn't make it.

Once they are dry place them by their corresponding plants.
Photobucket
Actually, I am not sure if this is zucchini. It could be summer squash or Cucumbers. I will know for sure in a few weeka. Although I shouldn't have this problem next year, thanks to the rocks!